
Extensions & Modules
CLICK HERE To view a DEMO on our DEMO Website. Not all extensions have a demo.
SPECIAL NOTE: All of our extensions are for OpenCart 3.0.3.8 - 3.0.4.0 All previous versions of OpenCart have been rendered useless with the implementation of PHP 8.xx and OpenCart 4.xx. We have available a version of OpenCart 3.0.3.8 - 3.0.4.0 that works with all PHP 8.xx versions. If you would like to upgrade your OpenCart store to this version, please use our upgrade service. We will implement the upgrade and in most cases your customer and order data will be preserved. The new OpenCart 4.xx versions have completely rendered all previous versions of OpenCart extensions useless. Until a time that we can upgrade (complete re-write) our extensions, we will focus our energy on OpenCart 3.0.3.8 - 3.0.4.0 which we feel is the best OpenCart version to date.
Regards
YYZ Development Support
")
")
")
")
")
")
The Payment System (LAYAWAY, LAYBY) extension is a comprehensive payment system extension for OpenCart.
It is a feature rich module that takes off where our now popular Payment System extension left off. It gives store owners complete control on how to accept partial payments. It can be used as Layaway, Lay by, EZ Payment Plan, Payment Plan, etcetera. You have the ability to name the buttons/system files, add various terms, select all or one product, and much more. The extension is a rock solid professional grade ground up payment system. The list of features is very extensive. Please see the demo for further details and get a feel for how it works.
Features:
✔ Ability to name the buttons and system files
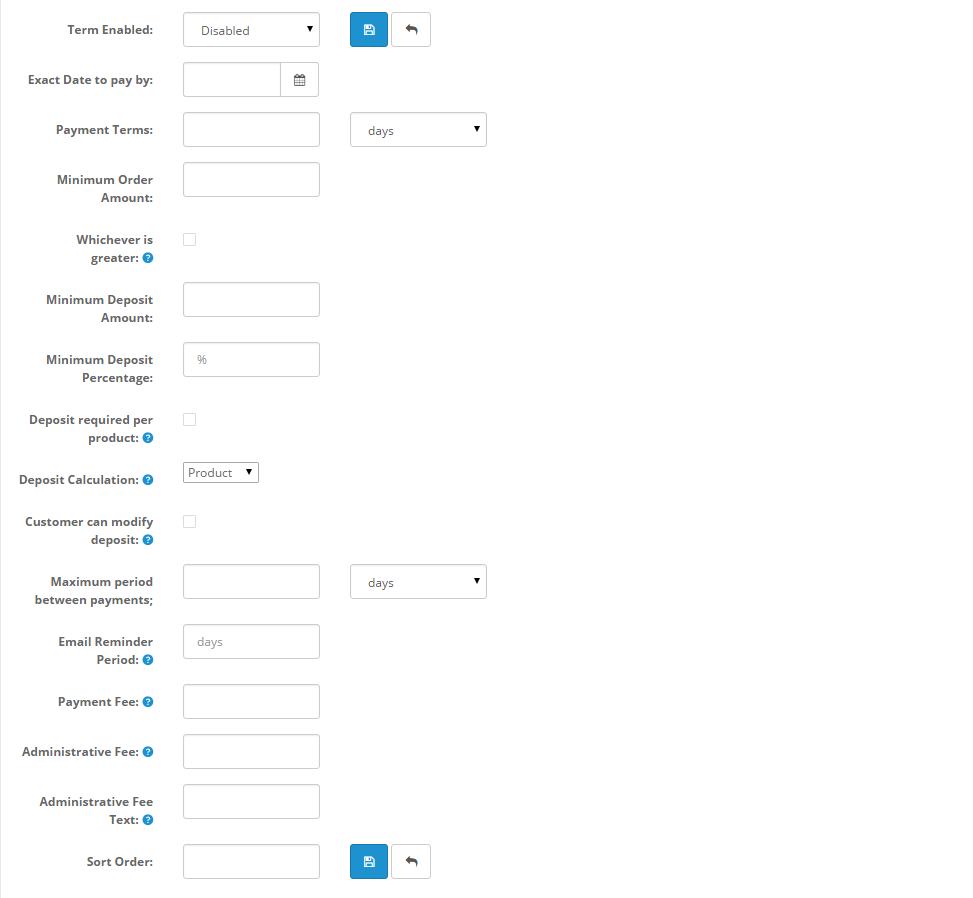
✔ Set various payment terms
✔ Allow regular sales or payment sales
✔ Comprehensive customer notifications
✔ Uses cron jobs to send out payment reminders
✔ Select individual or all products to allow payment sales
✔ Detailed payment information during checkout
✔ Customers can select which payment plan suits them during checkout
✔ Allow multiple payment/terms options per product
✔ Select specific payment gateways for payment transactions
✔ Select specific order statuses for payment sales
✔ Show / don’t show buttons
✔ Set exact payment days
✔ Set maximum time between payments
✔ Set minimum payment amounts
✔ Calculate deposits by product or sale total
✔ Add payment or administrative fees with ability to name them
✔ We added support for the Journal2 theme for OpenCart version 2.1.x When using payment system pro only the standard checkout can be used. The extension will not work with their Quick Checkout one page checkout.
✔ FREE BASIC INSTALLATION (within 5 days from the date of purchase)
Special note: If you have a Custom Theme you may have compatibility issues. We can address most issue but there may be an additional fee involved for adjusting the extension.
| COMPATABILITY | |
| 3.0.3.8 - 3.0.3.9 - PHP 8.1 + | OCMOD |
| Journal2 Theme | Works with Journal2 theme but not the Quick Checkout one page checkout |
| One Step-Page Checkout | Does NOT WORK with any one step checkout |
| Custom Theme | Works with some custom themes as long as the theme maintains default OpenCart coding standards |
INSTALLATION INSTRUCTIONS & USER GUIDE:
Be sure to ALWAYS backup your database and store files before installing ANY extension.
1) Go to Extension>Installer. Upload the .ocmod zip file then press the refresh button on the Modifications page.
EXTENSION SETTINGS & SETUP:
- Go to Extension/Modules Find the Extensions name and click install.
- After installation click edit to adjust extension settings.
- After making extension settings be sure to go to Extensions/Modifications and click refresh.
- If you are using any type caching software or increase speed software. Be sure to refresh the cache after extension installation.
- Go to admin, click on Extensions/Modules/Payment System, click install then edit and set all of the Payment System general parameters and payment terms then click save.
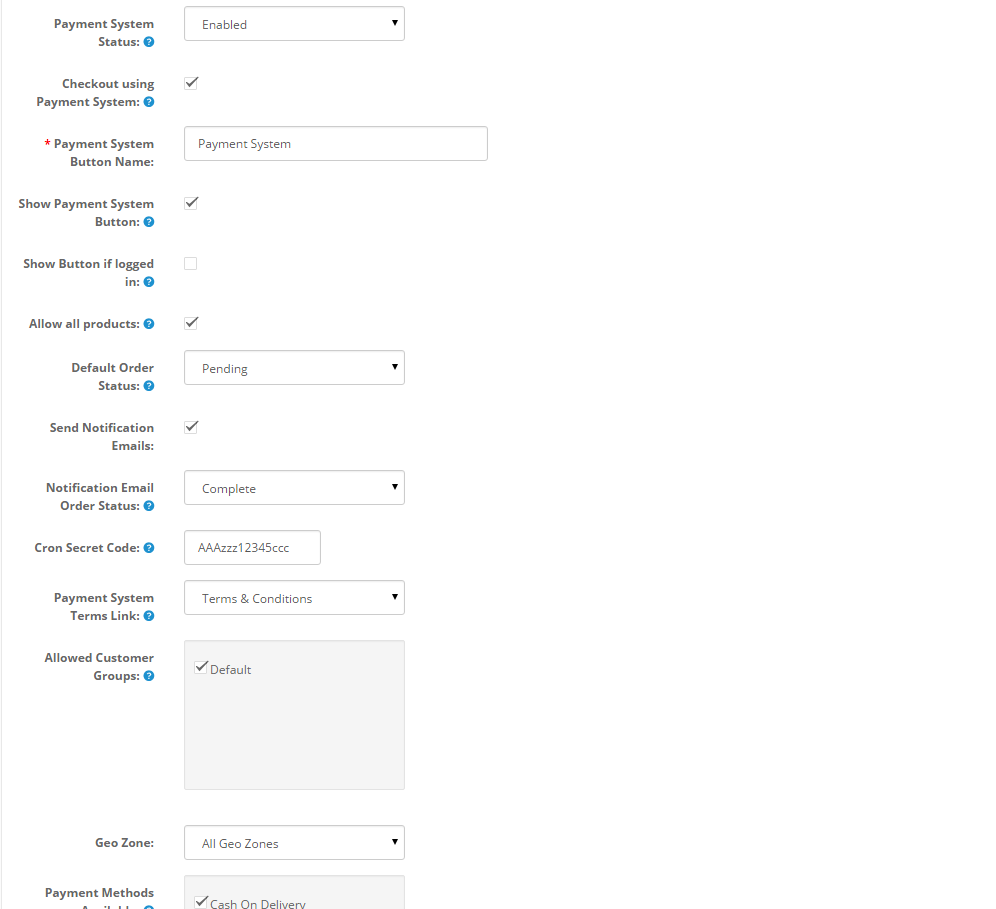
- Payment System Pro has 2 product settings.
a) Set all products to use payment system. This will flag all products to be allowed to checkout using payment system.
b) If the above setting is not made, then you have to edit each product in the data tab to Buy using Payment System. This allows you to set per product as opposed to all products. If all products is set in general settings it will override the individual setting.
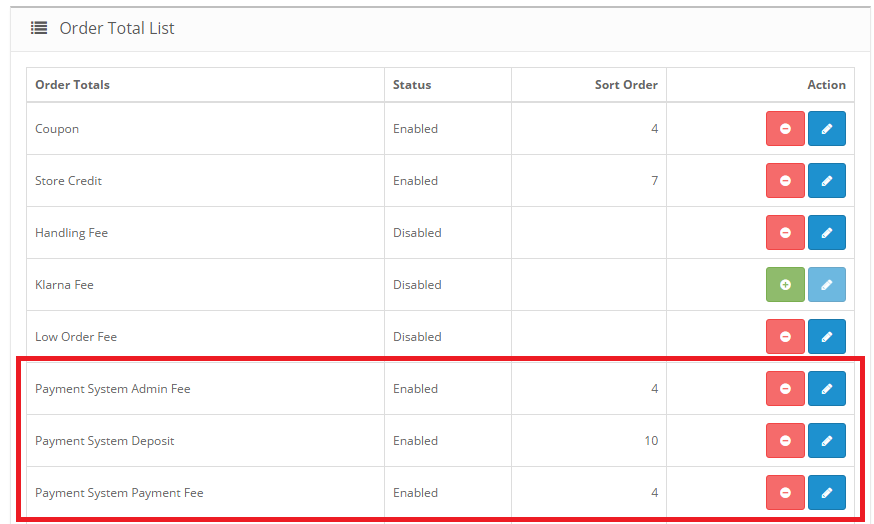
- Go to Extensions/Order Totals/ and set the payment system order totals. The sort order is crucially important otherwise cart calculations will be incorrect.
There are 3 that must be set. See example below:
- Payment System Admin Fee
- Payment System Deposit
- Payment System Payment
When using Payment System Pro customers CANNOT use the guest checkout feature in OpenCart. Your customers will not be able to checkout using guest checkout when a payment system product is in the cart, even if it is enabled. Guest checkout does not grab enough information for payment system pro to work properly. You can leave it enabled if you'd prefer so your customers can checkout on regular non payment system sales.
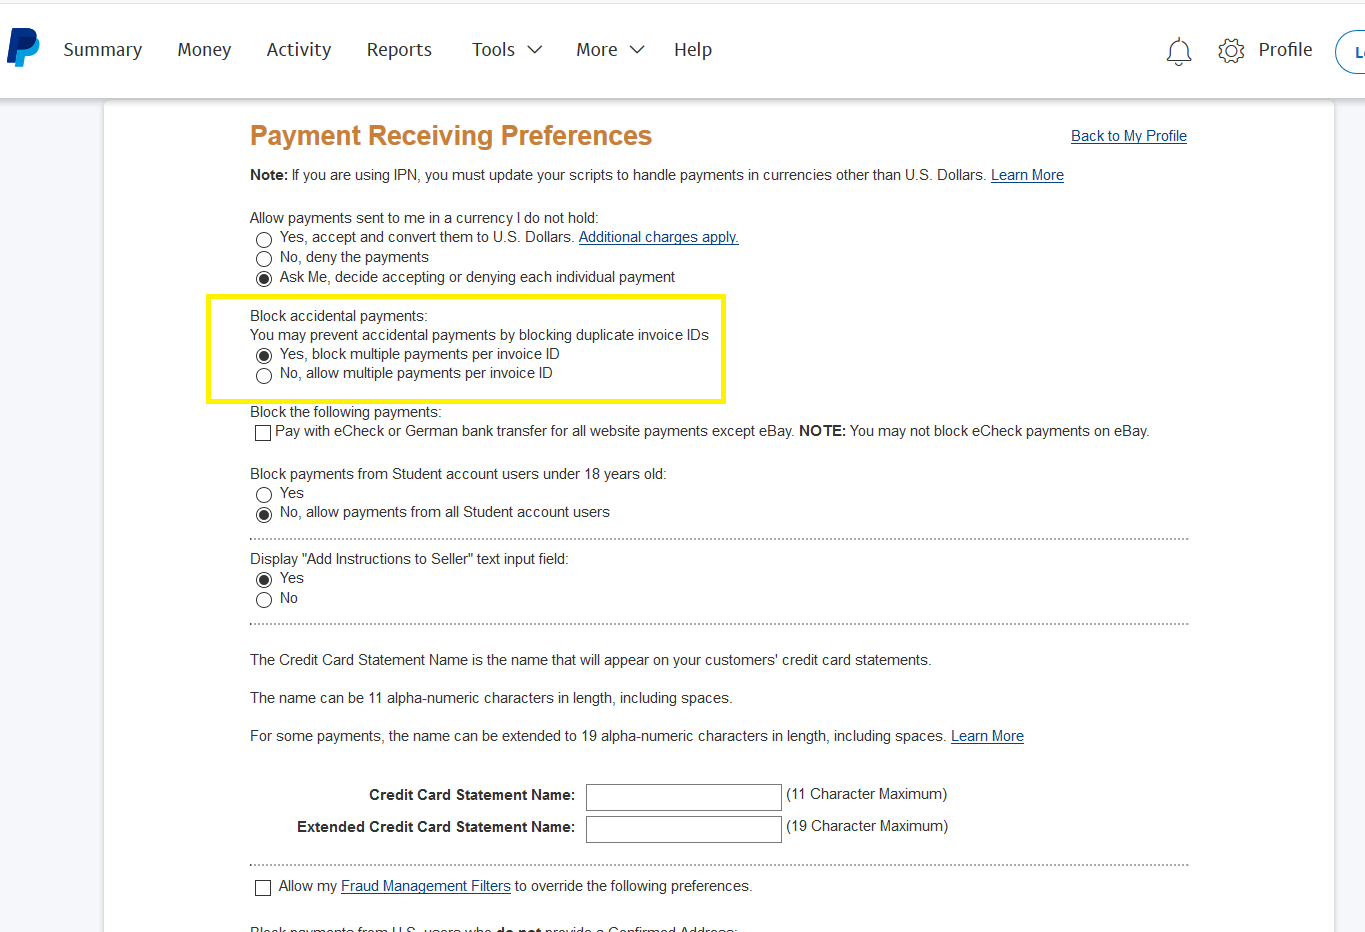
SPECIAL PAYPAL STANDARD NOTE:
ADDITIONAL NOTES:
Although we have taken every step to foresee any problems or errors that may happen, this is in no way a Guarantee that this Extension will work with a highly modified OpenCart store or installation. We can certainly help you with basic information but there may be a situation where USING THIS EXTENSION COULD COST YOU MORE MONEY.
EMAIL NOTIFICATIONS:
Standard Method
The email notifications work when a customer goes to the storefront or the admin user goes to the admin. It is a function in the footer that triggers the notifications to be sent out. So this means that if no one visits the admin or store front the email notifications will not go out until someone visits either one.
Using Cron Jobs Method
When using the cron job method for email notifications the user must have common knowledge on how to setup a cron job using cPanel or WHM.
cPanel or WHM Overview
Cron jobs are scheduled tasks that the system runs at predefined times or intervals. Typically, a cron job contains a series of simple tasks that the system runs from a script file.
Note:
Exercise caution when you schedule cron jobs. If you schedule them to run too often, they may degrade your server's performance.
Add a cron email
The Cron Email section of the interface allows you to enter an email address for the system to send notifications when your cron jobs run. To set an email address, perform the following steps:
- In the Email text box, enter the email address at which you wish to receive the notifications.
- Click Update Email.
Add a cron job
-
To create a cron job, perform the following steps:
- Select the interval at which you wish to run the cron job from the appropriate menus, or enter the values in the text boxes.
-
Common Settings — This menu allows you to select a commonly-used interval. The system will configure the appropriate settings in the Minute, Hour, Day, Month, and Weekday text boxes for you.
Note:
If the wildcard characters (
*) and intervals confuse you, this menu is an excellent way to learn how to configure the other fields. - Minute — Use this menu to select the number of minutes between each time the cron job runs, or the minute of each hour on which you wish to run the cron job.
- Hour — Use this menu to select the number of hours between each time the cron job runs, or the hour of each day on which you wish to run the cron job.
- Day — Use this menu to select the number of days between each time the cron job runs, or the day of the month on which you wish to run the cron job.
- Month — Use this menu to select the number of months between each time the cron job runs, or the month of the year in which you wish to run the cron job.
-
Weekday — Use this menu to select the days of the week on which you wish to run the cron job.
-
-
In the Command text box, enter the command that you wish the system to run.
Example:
In Admin/Extensions/Modules/Payment System be sure your have set the secret code.
As an example we can now set a cronjob by setting the secret code to 12345678 (do not use 12345678 just an example).
wget –qO http://www.YOURWEBSITE.com/?secret_code=12345678
Using cpanel we can now get the command to execute everything at 8:30am using the above command.
Or if your using crontab, you can add the line
30 8 * * * wget –qO http://www.YOURWEBSITE.com/?secret_code=12345678
Important:
- You must specify settings for the Minute, Hour, Day, Month, Weekday, and Command text boxes.
- The interface displays a green check mark icon (
 ) next to each setting that you properly set.
 - If you enter or select an invalid setting, the interface displays a red warning icon (
 ) next to that setting.
- The interface displays a green check mark icon (
- Exercise extreme caution when you use the
rmcommand in a cron job. If you do not declare the correct options, you may delete your home directory's data.
- You must specify settings for the Minute, Hour, Day, Month, Weekday, and Command text boxes.
- Click Add New Cron Job.
USER GUIDE:
The Payment System Pro extension is a comprehensive payment system extension for OpenCart. When customers checkout if selected they will have the ability to select a payment plan for the sale.
If you have any questions about the installation process or how to use the extension please contact us.
Payment System (LAYAWAY, LAYBY)
- Developed By: YYZDEV.COM
- Product Code: payment_system
- Availability: In Stock
-
$39.00